Schedules
Schedules are a crucial aspect of sending omnichannel content from the RedEye platform
Schedules are actions from the database, such as sending an email/SMS or extracting data to a partner or from the platform.
There are various types of schedules that you can add to a campaign. We support the following types of schedules:
- Email
- Email via API (recurring campaigns only)
- AB Test Schedule (Run Once campaigns only)
- SMS
- SMS via API (recurring campaigns only)
- Extracts
- Custom Extracts
- Social
- Google Audience
- Direct Mail
- Urban Airship
- Push message
- Push message via API (recurring campaigns only)
- Control Test
- Send Time Optimisation (STO)
- Web Push
- Setup guide can be found here (run once campaigns only)
Email
How to set up an Email Schedule
Please see our video below on how to set up an email schedule:
There are 3 types of email schedules that you can add to a campaign. These schedules are:
- Email via API (recurring campaigns only)
- AB test schedules (Run Once Campaign & Email only)
You can set up a standard email schedule in both Run Once and Recurring campaigns. However the other types are restricted to specific campaign types listed above.
All these email schedules are set up in similar ways, the video above explains the basics. Email schedules generally require 5 items to be added to them:
- Subject Line
- Friendly From
- Recipients/Rules*
- HTML Creative
- The visual email customers will receive. (See Asset Manager and Email Builder)
- Text Creative
- A rarely-received accessibility fallback for deliverability purposes (See Asset Manager)
* API Schedules recipients are sent via the API call. For more information, see API Email Schedules.
AB Test Schedule
AB Test schedules allow you to do a side-by-side test of either Subject Lines or Creatives against one-another without wasting data on a poor performing variant. These testing schedules work over a period of time to gather results from an initial split of your attached recipients (i.e. 10% get variant A, 10% get variant B, 80% get sent the winner). For this reason they cannot be used on Recurring Campaigns.
To perform recurring tests, please use Control Test schedules
AB Testing schedules are initially set up in a very similar way to Email Schedules, however depending on what type of AB Test you choose you'll be required to add 2 of that item:
Selecting your test type when adding an AB Test to your campaign
- Subject Line tests will ask you to provide 2 Subject Lines
- Creatives tests will ask you to provide 2 HTML and Text versions
How to set up an AB Test schedule🎥
Please see our video below on How to set up an AB Test schedule
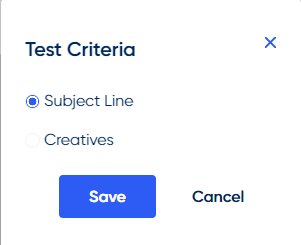
The test cannot be commissioned if the following criteria applies:
Fewer than 10 recipients will receive the full schedule after rules have been applied.
The send time and date are in the past or equal to the current time and date. To enable the Commission button, change the test to use a future send date and time.
Tips for the perfect AB Test!
- Ensure your test is clear - e.g. urgency vs no urgency
- Having a clear test is crucial for measuring the success of a test
- Have concise Subject Lines
- Going over the recommended 70 character limit for subject lines can lead to diminished results
- Only test 1 thing at a time!
- You need to make sure you can see what's made the impact
- Test with a substantial dataset
- Testing with small datasets doesn't give a true reflection of your customer base
SMS
How to set up an SMS schedule🎥
Please see our video below on How to set up an SMS schedule
There are 2 types of SMS schedules that you can add to a campaign. These schedules are:
- SMS
- SMS via API (Recurring campaigns only)
You can set up a standard SMS schedule in both Run Once and Recurring campaigns. However SMS via API is restricted to a Recurring campaign.
These SMS schedules are set up in similar ways, the video above explains the basics. SMS schedules generally require 3 items to be added to them:
- Friendly From
- Recipients/Rules*
- Text Message
- The text message the customer will receive
* API Schedules recipients are sent via the API call. For more information on API schedules, see API SMS Schedules.
SMS Character Limits
- While an SMS doesn't have a set character limit, each "single" SMS counts as 160 characters. Anything over this character count will be costed as multiple SMS sends, but the customer will still receive them as a single SMS.
Always use your opt-out wording!Legally your opt-out wording needs to be included in all marketing SMS messages! Your SHORTCODE can be obtained via your Customer Success Manager.
Text SHORTCODE to 60064
Push
To receive incoming push messages from the OS push notification service, your OS-specific app must be installed on a device.
There are 2 types of Push schedules that you can add to a campaign. These schedules are:
- Push
- Push via API (Recurring campaigns only)
You can set up a standard Push schedule in both Run Once and Recurring campaigns. However Push via API is restricted to a Recurring campaign.
These Push schedules are set up in similar ways, the video above explains the basics. SMS schedules generally require 3 items to be added to them:
- Recipients/Rules*
- Push Message
- The push message the customer will receive
* API Schedules recipients are sent via the API call. For more information on API schedules, see API Push schedules.
Web Push (Beta)
Before utilising Web Push in your campaigns, please follow the setup guide here.
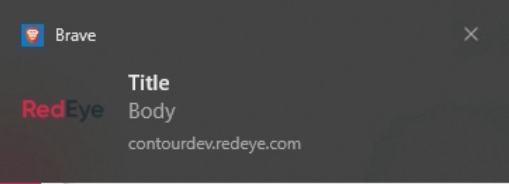
You can configure the contents of your Web Push notification once it's been added to a campaign.
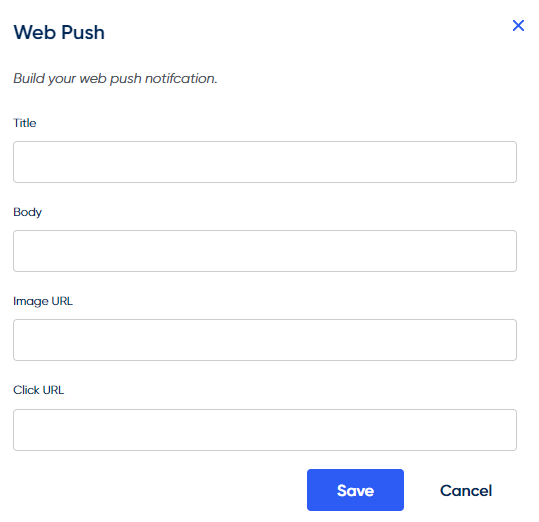
- Title - Title text
- Body - Body text
- Image URL - URL of the image you would like to display
- Click URL - URL where the user will be directed to once they click the notification
Once configured, you can use the preview icon to display the notification on your browser. You will get a popup like this, but with your client details:
Warning:There is currently a bug with copy & pasting Unicode characters when building your web push notifications. Please input Unicode characters manually instead of using copy & paste functionality.
Tips for a good web push notification:
- Try not to just rely on the native browser prompt to opt the user in. Instead, create a custom popup that on the click of the button will trigger the prompt (more info on how to do this inWeb Push Setup)
- Ask users to subscribe to push when there is a clear benefit, such as:
- At the end of an order journey to get notified of future deals
- During the sign up process
Send Time Optimisation (STO)
STO is a process used to send content to recipients at a time that is optimal for them. The underlying concept being that everyone has their own routines and will do things in their own time, some people may check their email first thing in the morning others later in the evening. Therefore STO attempts to identify when this time is for each recipient, as this is the point that they are most likely to engage, and sends the content to them at this time.
This means you are able to commission a single schedule and have it send out over a 24 hour period with each recipient receiving it at a time we have determined is most optimal for them as opposed to sending to all recipients at 1 single time.
STO Schedules
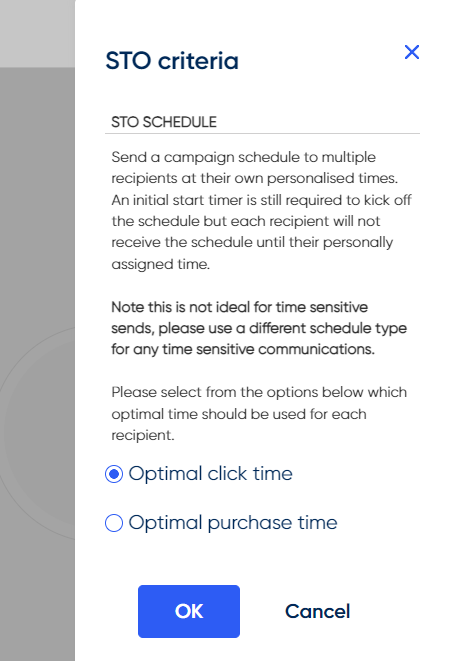
STO introduces a new Schedule type to CMT accessible in the toolbar. Upon dragging the STO schedule onto the canvas a new menu will appear asking the user to select which of the optimal times they wish to power the schedule.
You can choose from one of two times to send:
- Optimal Click Time
- Optimal Purchase Time
STO Schedules can be set up in the same fashion as a regular email schedule, with the only stipulation being that they can not have follow-on schedules (due to the complications of working out when the follow on should send for the attached recipients.)
Note for Recurring STO schedules: When commissioning recurring STO schedules, they will start the following day after the start timer so it starts on a full 24hr period from when the start timer is set.
To help with understanding the effectiveness of these compared to regular email schedules, they can also be set up as test cells on Control Test schedules.This allows you to create a control test using a regular email as the control cell and an STO schedule as the test cell. You can then compare the performance with regular schedules easily.
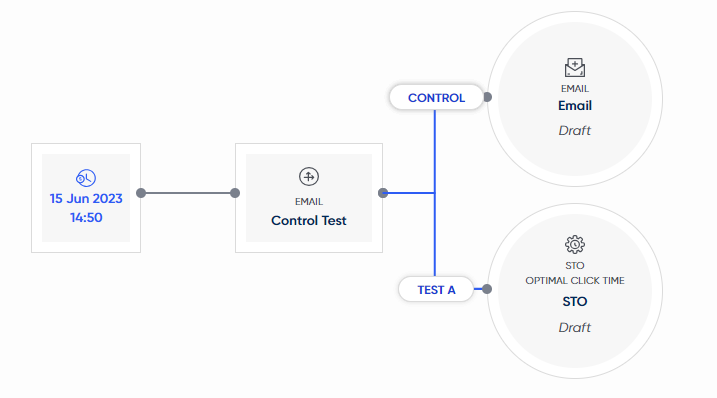
Example of a control test used to compare regular email schedules to an STO schedule
STO Schedule Summary
To see how the sends for all of the attached recipients will be spread out, a new panel has been created on the Schedule Summary Screen called STO Times to display a graph visualising this distribution.
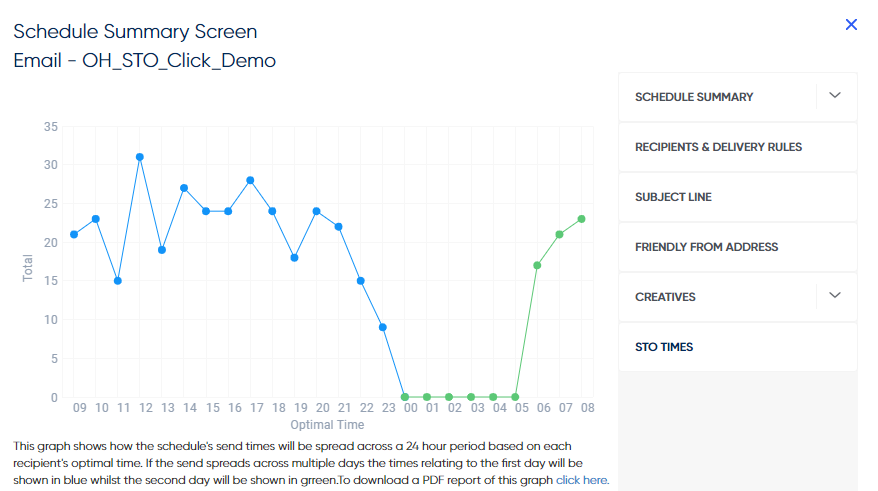
STO Times Graph
Above is an example of an STO schedule set to start sending at 09:00am. Along the X-axis of the graph you can see each hour of the day with the Y-axis showing the total number of recipients at the appropriate hour. The line on the graph starts as blue for all hours that are on the same day as the initial send and then later changes to green as we pass midnight heading into the next day. If you were to update the start timer for this schedule to a different hour and checked this graph again you would see that it updates to start the graph from the new hour set on the start timer.
Additionally, the ability to set a cut off time for the STO schedule has been added on the main commission screen. This allows you to select a start date using the regular start timer and have the STO schedule send to recipients between the start time and the provided cut off time. Ordinarily, the STO schedule will send to a recipient at their own optimal time however if a cut of time is provided and a recipient's time is after this point they will instead be queued to receive it at the cut off hour.
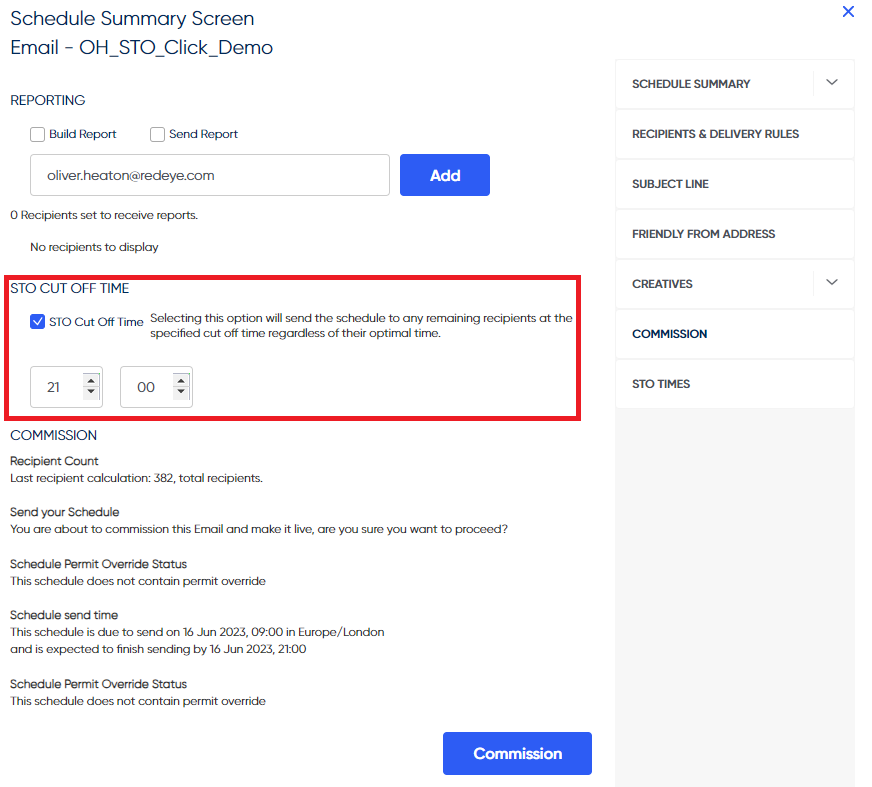
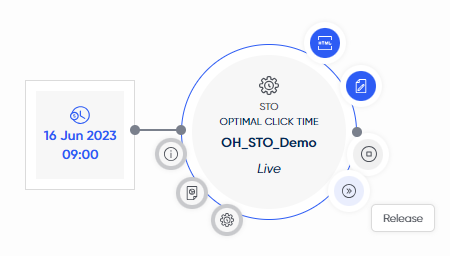
Finally, once the schedule has been commissioned you will still have the regular stop option in the radial menu but you will also have a release option. If for whatever reason you wish to either stop all remaining recipients from receiving the schedule or send to all remaining recipients you can simply select the relevant option from the radial menu.
Extracts
Extracts allow you to take segments and pull the customer data from the platform. This data can be extracted to the SFTP, or directly to our integrated partners.
There are 4 types of Extracts that can be done within the RedEye platform:
- Custom Extracts
- These allow you to take a segment, choose some database parameters and extract that data.
- Social Extracts
- These extracts allow you to integrate with Facebook and Google Audience directly by extracting our data to their platforms.
- Direct Mail Extracts
- These extract address/postal details from the platform for use in Direct Mail.
- Urban Airship Extracts
- Our integration with Airship allows you to extract data for use with their Push messaging systems.
These extract schedules follow the same principles, please read on to see how they are set up.
General Extracts Overview
All extracts in the platform are set up in the same way, the video below will take you through a "Custom Extract" which is the most customisable. Other Extracts, such as Social or Direct Mail, will limit your options to work with the respective integrations - thus are generally easier to set up.
All Extracts can be set up on a Run-Once or Recurring campaign, allowing you to automate Social activity or Custom Extracts.
How to set up an Extract Schedule🎥
Custom Extracts
Custom Extracts enable you to choose what data you want to be extracted from the database, which will then be delivered to your SFTP account under the specified filename. You can choose any parameters in the platform when using Custom Extracts, and also apply delivery rules to the schedule to overlay additional logic.
Social Extracts
Social Extracts allow you to extract social-specific data to the SFTP or directly to our partners via the Facebook and Google Integrations.
The Social platform you want to extract to is chosen when setting up your Social Extract schedule:

Social Channel Selection Screen
Be sure to enable our Facebook and Google Adwords integrations to get the most out of your social extracts!
Social Extracts will restrict what data is extracted to just EMAIL and MOBILE. The main benefit of using social extracts over custom extracts is that the data can be extracted directly to your Facebook or Google account under the following format:
- Facebook: Facebook Custom Audience in your Facebook Account.
- Google Customer Match: Google Customer Match in your Google Account.
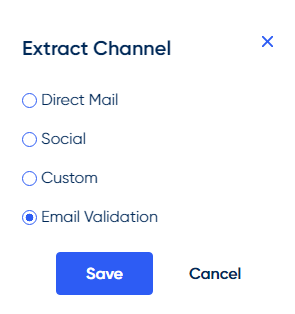
The integration Extract Method can be chosen in the Extract Summary panel:

"Extract Method" window in the Extract Summary Panel
When set up on a Recurring basis, Social Extracts allow you to automate these audience updates to your Facebook or Google accounts. This enables you to automate your social journeys, and also tie these in with other Channels added to your campaign.
Direct Mail Extracts
Direct Mail Extracts will extract the following information to the SFTP by default which can then be sent to your Direct Mail provider:
- CUSTREFID
- EMAILPERMIT
- TITLE
- FIRSTNAME
- LASTNAME
- HOUSENUMBER
- ADDRESS1
- ADDRESS2
- ADDRESS3
- ADDRESS4
- POSTCODE
- POSTALPERMIT
- SCHEDULE_NAME
More parameters can be chosen in the Extract Picker.
[Data Insights to provide extra details]
Urban Airship Extracts
Our integration with Urban Airship allows you to extract data from our platform, alongside the data required for Urban Airship to run push campaigns. With this integration you get a seamless experience automating/moving data between the RedEye and Airship platforms.
You can choose the name for your Airship Extract, and also the secondary field to be used in your Airship account:
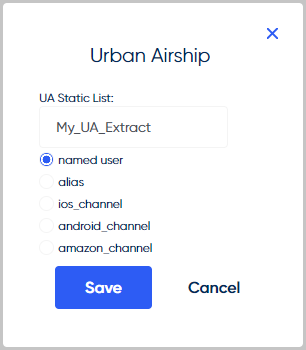
Airship List Configuration Screen
Email Validation Extracts
Our integration with Validity Everest which is an email deliverability platform, allows you to validate your email addresses to see if they are safe or risky to send to.
To be able to create Email Validation extracts the appropriate permission is required otherwise the extraction choice will be greyed outContact your Customer Success Manager if you would like access to Email Validation extracts.
Creating Email Validation Extracts
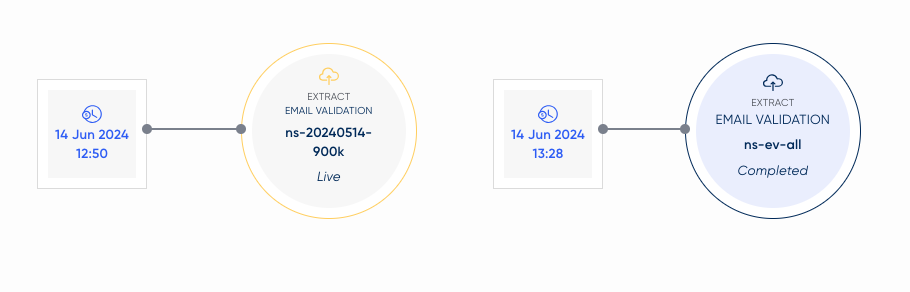
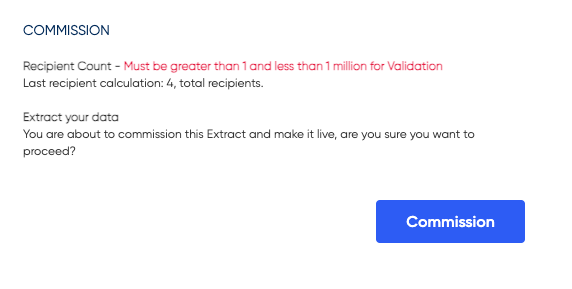
Use the Extract tool to create an Email Validation extract as shown above. You need to connect a start timer and add your segment or list to the extract in order to set it live. When the extract is commissioned it will show as LIVE and will create an entry in the Email Validation table in the Admin area of the platform. Once the extract has been validated and imported into the platform it will change to COMPLETED.
Validity have a minimum requirement of two emails addresses and a maximum of one million.If this requirement is not met, the extract can still be commissioned but when trying to validate later it will be rejected.
Managing Email Validation Extracts
Email Validation Extracts can be managed in the Admin area of the RedEye Platform.
Click here to read more
Control Tests
Control Tests allow you to do more than the standard AB Test schedules, while also enabling the creation of automated tests.
Control Tests are set up in a very similar manner to a standard Email Schedule, and can have the same items attached. However, the segments are attached to the Control Test Parent schedule itself, and the creative aspects to the Child schedules. See below for more information:
How to set up a Control Test
Parent & Child schedules
A Control Test consists of two parts, connected together to create your test:
- The "Parent Schedule" which is the Control Test schedule itself:
- This controls the segments & rules that the schedule is being sent to, and also how this is split between the "Child Schedules"
- Multiple Child Schedules:
- These child schedules control the content of the tests themselves:
- Subject Lines
- Creatives
- Friendly From Address
- There is a single "Control" child schedule, and up to 9 "Test" child schedules per parent
- These child schedules control the content of the tests themselves:
Control Test Configuration
The screen below shows the options you have for configuring your Control Test, such as:
- The percentage split of the data between control/tests
- The number of tests you want to run at the same time
- Whether you want to exclude certain control/test schedules to maintain a Control.
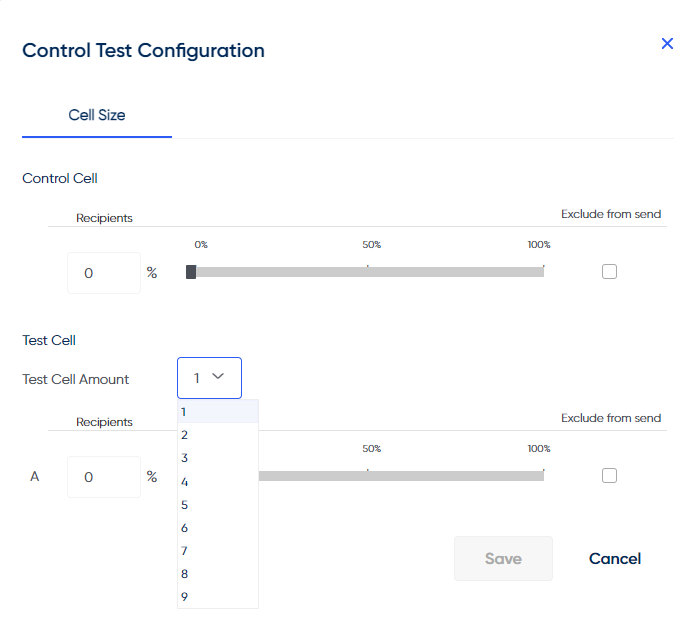
The Control Test Configuration Screen
Control Tests allow you to test different channels against each other!For example:
- An email vs. an SMS
- A 2-part Email Journey vs. an Email & SMS journey combined
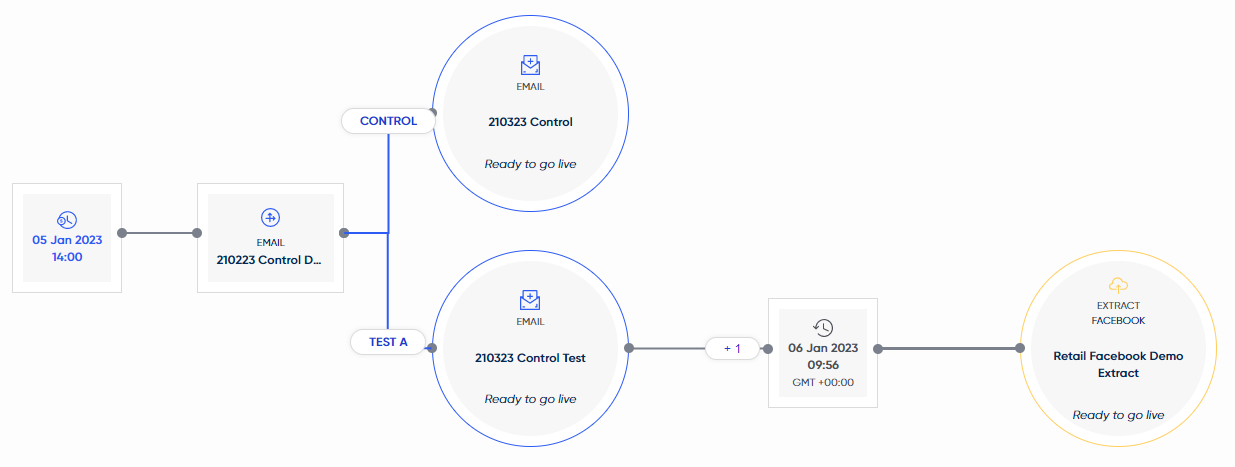
An example of a control test, testing a single Email send against an Email with a Facebook Social Campaign after 1 day.
Control Test schedules cannot currently be copied.A new Control Test parent schedule must be made for revised versions.
How to copy a schedule
Most schedule types can be copied by clicking the "Tools" icon on the schedule, then the "Copy" button:

Use the Tools icon on a schedule to copy
You can then choose how many copies you want to make and the name of each copied schedule:
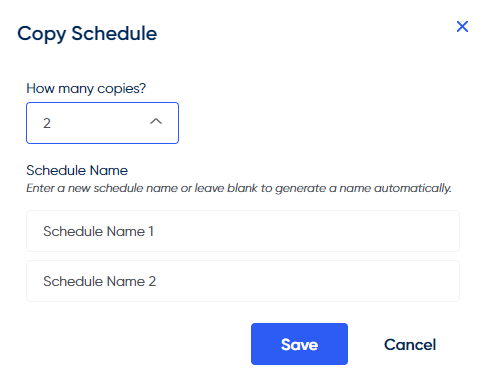
Copied schedules with no manually-entered name will create an automatically generated schedule name instead
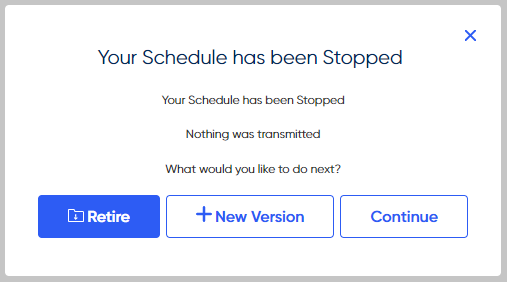
How to stop a schedule
Only schedule that are in the "Live" state can be stopped. This is done by clicking the "stop" icon on the live schedule:
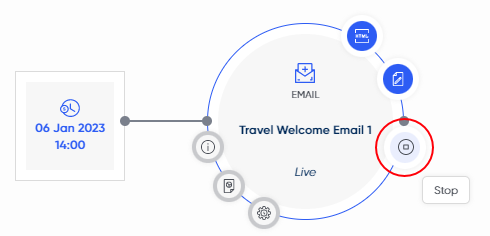
Once you've stopped the schedule, you'll be asked what you would like to do with it:
There are 3 options:
- Retire will fully retire this schedule, making it inactive. Only copies of Retired schedules can be made.
- + New Version will put the schedule back into the "Ready to go live" state so that you can make edits to the schedule and re-commission it.
- You will notice a "V2" appear by your schedule to signify it's been stopped previously.
- Continue will keep the schedule in the "Stopped State"
Updated 10 months ago